Showing posts with label desserts. Show all posts

E is for Eight Maids-a-milking

Christmas Ice Cream in a Bag
Updated 27/12/2014.

On the eighth day of Christmas my true love gave to me - 8 Maids-a-milking.

We have joined with 11 other bloggers to celebrate the festive season by creating crafts and activities based on the 12 Days of Christmas. This blog hop full of Christmassy goodness is hosted by Silly Sparkles. Make sure you head over to the other blogs and have a look at the other 'Days of Christmas' too. Links are at the end of this post.

We chose 8 Maids-a-milking and I couldn't decide on whether to make Christmas milkshakes or Christmas ice cream.

With the really hot weather we are experiencing at the moment (hot even for Queensland in December) ice cream was the winner.

To make it a real hands on sensory experience for Bear and Bee I knew we had to try making Ice Cream in a bag.  If you haven't made ice cream this way before you definitely need to give it a go.  It's a great activity that is lots of fun to do and as a bonus uses up a little of the excess energy kids seem to have around holiday time.

Here's how we made our Christmas Ice Cream in a Bag.

Christmas Ice Cream in a Bag

Christmas Ice Cream in a Bag
Ingredients
300ml cream
2 tablespoons caster (or icing) sugar
1 teaspoon vanilla extract
3 or 4 candy canes
2 trays of ice cubes
6 tablespoons rock salt
1 large ziploc bag
3 small ziploc bags

Directions

Christmas Ice Cream in a Bag

1. Place the candy canes inside one of the small ziploc bags and then hit with a rolling pin until the canes are crushed into small pieces.
2. Pour the cream into one of the remaining small ziploc bags.  Place the bag into a coffee mug or small bowl to help it stand up and not spill over.
3. Add the sugar and vanilla to the cream and seal the bag well.
4. Place the bag of cream mixture inside another small ziploc bag to protect it well from the salt.
5. Put the ice and salt in the large ziploc bag and add the bag of cream mixture. Make sure the bag is sealed really well.

Christmas Ice Cream in a Bag


6. Now for the fun part.  Wrap a tea towel around the whole lot and start shaking and massaging the bags.
Christmas Ice Cream in a Bag

7.  Gloves are handy to protect little ones hands from the cold or you could put the whole lot (minus the tea towel) inside a large coffee can or baby formula tin and start rolling it around.
8.  Keep shaking or rolling for 5-10 minutes or until the cream mixture has thickened.  It will be like soft serve ice cream.  Ours took 10 minutes.
9. Remove the small bag of ice cream from the other bags.  Wipe carefully with a clean cloth to remove any traces of salt.

Christmas Ice Cream in a Bag
10. Use scissors to snip off the corner of the bag and squeeze the ice cream into cones or bowls.

Christmas Ice Cream in a Bag

Christmas Ice Cream in a Bag
11. Sprinkle with the crushed candy canes and enjoy.

Christmas Ice Cream in a Bag
A very happy Bee with her Ice Cream

If your kids like candy canes, add the crushed canes to the cream mixture in step 3.  Bear doesn't like candy canes and Bee does so I just added them at the end.

Christmas Ice Cream in a Bag


http://sillysparklessensory.wordpress.com/12-days-of-christmas-blog-hop-2/


Click on the images below to follow each of the 12 Days of Christmas craft ideas!

F is for Frozen inspired ice blocks

F is for Frozen inspired ice blocks

As one newspaper columnist put it last weekend, we are in the midst of a great Frozen drought here in Australia.  Not the weather related kind but the movie version.  There is no merchandise for the Frozen movie to be had in stores.  Sure you can get the cheap knock offs on auction websites or a few overpriced items of official merchandise on other sites but apart from that it's certainly a wasteland.

Which makes celebrating, reenacting (in Bear's case) or retelling (in Bee's case) the story of Anna and Elsa that much harder. 

Christie from Childhood 101 has this great Disney Frozen DIY Ice Castle project that looks fantastic.  As soon as I can get my hands on some figurines I will be making one of these for Bear and Bee.

F is for Frozen inspired ice blocks

In the meantime, we came up with some Anna and Elsa homemade ice blocks to enjoy.  Chocolate for Anna and Vanilla Yoghurt for Elsa. We had fun using different shaped moulds for the ice blocks too.  Apart from regular popsicle shaped moulds, we used a heart shaped ice cube tray and a mini muffin tray.

They were so simple to make and the best part is that they are a reasonably healthy treat that both girls (and their mum and dad) enjoy eating.

Anna (Chocolate) Ice blocks
We used this recipe for Homemade Chocolate Popsicles for the Anna inspired ice blocks. 

F is for Frozen inspired ice blocks
Mix together the sugar, cornflour and cocoa powder.
F is for Frozen inspired ice blocks
Whisk the cocoa mix into the near boiling milk.
F is for Frozen inspired ice blocks
Once the custard has thickened, transfer it to a jug.
F is for Frozen inspired ice blocks
Fill the moulds with the chocolate custard.

Elsa (Vanilla Yoghurt) Ice blocks
These ice blocks are so simple I can't really call it a recipe.  All we did was freeze low fat vanilla yoghurt.
F is for Frozen inspired ice blocks
Spoon the yoghurt into the moulds.
We added small popsicle sticks to the ice blocks once they had been in the freezer for about 30 minutes. And then we allowed them to freeze overnight.

F is for Frozen inspired ice blocks
White and chocolate sprinkles, gold and blue coloured sugar to decorate the ice blocks.

F is for Frozen inspired ice blocks
Bear decorating her Elsa ice blocks.

F is for Frozen inspired ice blocks
Bee enjoying her Anna ice block.

C is for Chocolate Raspberry Muffins

Muffins are a great lunchbox addition at any time of the year but as the weather starts to cool I like my muffins to do double duty.  A warm muffin with vanilla ice cream or custard makes the perfect dessert. And if, like me, you wrap the muffins in plastic wrap and store them in the freezer, its a quick and easy dessert too.

Chocolate Raspberry Muffins


These Chocolate Raspberry Muffins taste a little like a cherry ripe chocolate bar but are a healthier option (depending on what you serve them with of course).

The original recipe is from the Australian Institute of Sports website.  To make life easier I have made a printable card for this recipe which you can download here.

Chocolate Raspberry Muffins

Recipe credit: Australian Insitute of Sport
Makes 12

Ingredients
2½ cups self-raising flour
¼ cup baking cocoa
½ teaspoon bicarbonate of soda
¾ cup caster sugar
½ cup dark chocolate chips
1 tablespoon margarine, melted
1 cup skim milk
1 egg
300 g frozen raspberries

Directions
1. Preheat oven to 180°C (350°F).
2. Line a 12-hole muffin pan with paper muffin cases. Putting the paper cases into the tray is a great step for even really young children to help with. We actually made some regular sized muffins and some mini muffins which are a great size for Bear and Bee's lunchboxes. 

Chocolate Raspberry Muffins
3. Sift flour, cocoa and bicarbonate of soda into a large bowl. 
4. Stir in sugar and choc bits and make a well in the centre.

Chocolate Raspberry Muffins
5. In a small bowl, use a fork to whisk together margarine, milk and egg, then add to flour mixture.
6. Stir gently until mixture is just combined (do not over-beat).

Chocolate Raspberry Muffins

Chocolate Raspberry Muffins
7. Gently fold raspberries through mixture. We actually crushed our raspberries up while frozen by placing them in a ziplock bag and gently hitting them with a rolling pin.  This gave us tasty little raspberry peices all through the muffin mix rather than lumps of whole raspberries.

Chocolate Raspberry Muffins
8. Spoon mixture into cases.
9. Bake for 20-25 minutes or until muffins are well risen and spring back to the touch. Leave in pan for a few minutes, then transfer to a wire rack to cool.


S is for Strawberry Shortcake Kebabs

With Strawberry season still going strong here, I thought it would be timely to re post this article that I originally wrote for the Wide Bay Kids blog.

Yay! Strawberry season is here. I love the fact that here in Queensland we get these bright red, delicious bursts of sunshine right when the weather is turning grey, cold and miserable.

Bear and Bee love strawberries and would eat them year round just like apples and bananas. However like most fruits and vegetables, strawberries do taste best when eaten in season and for us that means eating as many as we can, in as many different dishes as we can over the next few months.

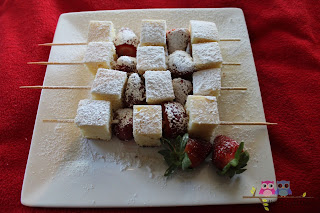
When I stumbled across the idea of strawberry shortcake kebabs on Pinterest I knew it would be a great dessert treat.

S is for Strawberry Shortcake Kebabs
Strawberry shortcake is usually made with a scone/biscuit type base. These can be crumbly and wouldn't hold up well to being on skewers. I decided to make a plain vanilla cake in place of the shortcake but a store bought Madeira cake or similar would work just as well if you don't have time to cook a cake. Once you have the cake ready this is a very easy recipe for the kids to put together.

Strawberry Shortcake Kebabs
Ingredients
1 plain vanilla cake
1 punnet of strawberries
Bamboo skewers
1-2 tablespoons icing sugar
300ml whipping cream, beaten until it holds on the spoon (you can use double cream if you don't want to have to beat it first)

Directions
S is for Strawberry Shortcake Kebabs
1.       Cut the cake into large cubes about 2.5 cm square.
2.       Wash and dry the strawberries and remove the leaves.

S is for Strawberry Shortcake Kebabs
3.       Thread the cake and strawberries onto the skewers alternately – eg. Cake, strawberry, cake, strawberry, cake.
S is for Strawberry Shortcake Kebabs
4.       Sprinkle with icing sugar using a small hand held sieve or shaker.

S is for Strawberry Shortcake Kebabs
5.       Serve with cream.

This would make a great dessert or children’s party treat.  Or a perfect end even to a barbecue picnic at the beach.

F is for Fathers Day Sundaes

The way to my hubby's heart is through ice cream - even in winter! We don't eat a lot of desserts but when we do indulge a good ice cream is essential.  So what better for Bear and Bee to make for their dad on Father's Day than Ice Cream Sundaes.

Ice Cream Sundaes a classic dish that most school aged children can make by themselves and depending on the toppings you choose, even younger children could make them with a little supervision.

Now what to put in our sundaes?  Strawberries are at their most delicious here right now so we had to include them.  Plus one of hubby's favourites chocolates - maltesers.  You could however use other fruit in season, such as bananas, any other favourite chocolates or lollies such as marshmallows.

Add to this list chocolate sauce and I thought is was all planned.  That was until I saw this post on Buzz Feed - 40 ways to make an amazing ice cream sundae.  Wow what a list.  So many possibilities.  What to choose?  Without a doubt it had to be Number 24 - doughnut chips.  Though I will be trying many of these suggestions, including the popcorn ones, when summer comes around.

F is for Fathers Day Sundaes

Father's Day Ice Cream Sundaes
Serves 4

Ingredients
500ml vanilla ice cream
2/3 of a punnet of strawberries (1 punnet = 250g)
50g packet maltesers, crushed
125ml chocolate sauce
4 cinnamon sugar doughnuts
2 tablespoons white sugar
1/2 teaspoon cinnamon

Directions
1. Preheat a sandwich press.

F is for Fathers Day Sundaes
Who me?

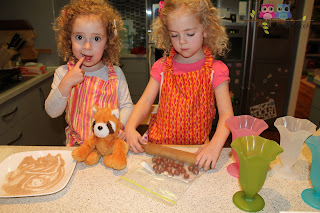
2. Crush the maltesers by placing in a zip lock bag and hitting with a rolling pin. Cut the stalks off the strawberries and cut in half.

F is for Fathers Day Sundaes
3. Cut the doughnuts in half horizontally and press cut side into combined cinnamon and sugar.
4. Line sandwich press with non stick baking paper and place doughnut halves in between layers.
5. Cook doughnut halves for 1-2 minutes or until sugar has started to melt.  Older children should be able to work the sandwich press under adult supervision, however this step I did while Bear and Bee watched.
6. Place doughnut chips on a plate to cool slightly.

F is for Fathers Day Sundaes
 F is for Fathers Day Sundaes
F is for Fathers Day Sundaes
 F is for Fathers Day Sundaes
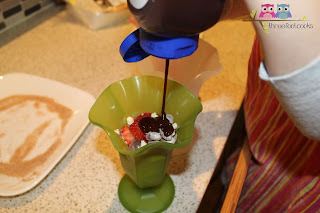
7. Start with the ice cream then layer on the strawberries, maltesers and sauce into sundae cups or bowls.

F is for Fathers Day Sundaes
8. Place the doughnut chips on the side of the cup.
9. Serve